Oh-My-Zsh 美化终端
Oh-My-Zsh 美化终端
bash & zsh 区别
一句话,二者均是shell的一种,zsh能基本完美兼容bash的命令,并且使用起来更加优雅。由于bash或zsh本质上都是解释器,他们所共同服务的是shell语言,因此在命令语法上基本相同,部分兼容性差异可参考:zsh和bash的兼容性差异。 二者切换:
- 切换bash:
chsh -s /bin/bash - 切换zsh:
chsh -s /bin/zsh - 在终端app的系统偏好设置里手动设置。
在配置文件方面:
- bash读取的配置文件:
~/.bash_profile文件 - zsh读取的配置文件:
~/.zshrc文件
当从bash切换为zsh时,如果不想重新配置一遍.zshrc文件,可以__在.zshrc文件中加上source ~/.bash_profile,从而直接从.bash_profile文件读取配置。
安装 zsh
#安装
sudo apt install zsh
#版本
zsh --version

echo $SHELL #当前shell
cat   /etc/shells # 所有shell
chsh -s /bin/zsh # 切换zsh

#设置默认shell
#r oot用户
sudo chsh -s /bin/zsh
安装 oh-my-zsh
官网:http://ohmyz.sh/
sh -c "$(curl -fsSL https://raw.githubusercontent.com/ohmyzsh/ohmyzsh/master/tools/install.sh)"# 方式二
# step 1 将代码clone到本地
git clone https://github.com/ohmyzsh/ohmyzsh.git ~/.oh-my-zsh
# step 2
cp ~/.oh-my-zsh/templates/zshrc.zsh-template ~/.zshrc
# step 3
chsh -s $(which zsh)
# step 4
# 退出终端,重新打开即可配置主题
配置
可配置自定义主题
# 编辑 ~/.zshrc 文件,将 ZSH_THEME 设为 haoomz。

vim ~/.zshrc

ZSH_THEME="haoomz"

source ~/.zshrc
推荐主题
- 内置主题样式截图 : 查看所有 zsh 内置的主题样式和对应的主题名,默认放在~/.oh-my-zsh/themes 目录下
# 查看主题
cd ~/.oh-my-zsh/themes && ls
拓展主题
powerlevel10k主题
- 根据 What’s the best theme for Oh My Zsh? 中的排名,以及自定义化、美观程度。强烈建议使用 powerlevel10k 主题。
   git clone --depth=1 https://github.com/romkatv/powerlevel10k.git ${ZSH_CUSTOM:-$HOME/.oh-my-zsh/custom}/themes/powerlevel10k

   # 中国用户可以使用 gitee.com 上的官方镜像加速下载
   git clone --depth=1 https://gitee.com/romkatv/powerlevel10k.git ${ZSH_CUSTOM:-$HOME/.oh-my-zsh/custom}/themes/powerlevel10k
在 ~/.zshrc 设置 ZSH_THEME="powerlevel10k/powerlevel10k"。接下来,终端会自动引导你配置 powerlevel10k。
# 重新配置
p10k configure
ultima 主题
官网:https://github.com/egorlem/ultima.zsh-theme
git clone https://github.com/egorlem/ultima.zsh-theme ~/ultima-shell
mv ~/ultima-shell/ultima.zsh-theme $ZSH/themes/ultima.zsh-theme

git clone https://github.com/heapbytes/heapbytes-zsh.git $ZSH/themes/heapbytes-zsh

git clone https://github.com/halfo/lambda-mod-zsh-theme.git $ZSH/themes/lambda-mod
安装插件
插件仓库
插件推荐
zsh-autosuggestions
zsh-autosuggestions 是一个命令提示插件,当你输入命令时,会自动推测你可能需要输入的命令,按下右键可以快速采用建议。
安装方式:把插件下载到本地的 ~/.oh-my-zsh/custom/plugins 目录。
git clone https://github.com/zsh-users/zsh-autosuggestions ${ZSH_CUSTOM:-~/.oh-my-zsh/custom}/plugins/zsh-autosuggestionszsh-syntax-highlighting
zsh-syntax-highlighting 是一个命令语法校验插件,在输入命令的过程中,若指令不合法,则指令显示为红色,若指令合法就会显示为绿色。
安装方式:把插件下载到本地的 ~/.oh-my-zsh/custom/plugins 目录。
git clone https://github.com/zsh-users/zsh-syntax-highlighting.git ${ZSH_CUSTOM:-~/.oh-my-zsh/custom}/plugins/zsh-syntax-highlightingsudo
sudo 的主要作用是,当我们输入某个命令,如 vim /etc/zshrc,发现没有系统权限,利用 sudo 插件,可快速将 sudo 作为前缀添加到命令最前面。

z
oh-my-zsh 内置了 z 插件。z 是一个文件夹快捷跳转插件,对于曾经跳转过的目录,只需要输入最终目标文件夹名称,就可以快速跳转,避免再输入长串路径,提高切换文件夹的效率。

zsh-history-substring-search
zsh-history-substring-search 在使用 zsh 时,通过 ↑ 或 ↓ 方向键,能实现类似按前缀匹配补齐的效果。
而如果输入的是中间的字符串,则没法自动补齐。这个插件真是为这个目的而生的。
 git clone https://github.com/zsh-users/zsh-history-substring-search ${ZSH_CUSTOM:-~/.oh-my-zsh/custom}/plugins/zsh-history-substring-search

 # 1.Activate the plugin in ~/.zshrc
 plugins=( [plugins...] zsh-history-substring-search)

# 2.绑定快捷键
bindkey "$terminfo[kcuu1]" history-substring-search-up
bindkey "$terminfo[kcud1]" history-substring-search-down

bindkey '^[[A' history-substring-search-up
bindkey '^[[B' history-substring-search-down


#  3.Run exec zsh to take changes into account
 exec zsh
extract
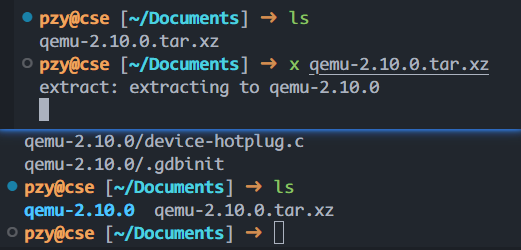
oh-my-zsh 内置了 extract 插件。extract 用于解压任何压缩文件,不必根据压缩文件的后缀名来记忆压缩软件。使用 x 命令即可解压文件

启用插件
修改~/.zshrc中插件列表为:
plugins=(git z extract sudo zsh-autosuggestions zsh-syntax-highlighting zsh-history-substring-search)
开启新的 Shell 或执行 source ~/.zshrc,就可以开始体验插件。
root用户
当你配置好登陆用户的 zsh 后,如果使用sudo su命令进入root用户的终端,发现还是默认的bash。建议在root用户的终端下,也安装on my zsh,设置与普通用户不同的主题以便区分,插件可以使用一样的。 root用户的~/.zshrc配置,仅供参考:
ZSH_THEME="ys"
plugins=(git zsh-autosuggestions zsh-syntax-highlighting z extract web-search)
# 或
plugins=(git colored-man-pages colorize cp man command-not-found sudo suse ubuntu archlinux zsh-navigation-tools z extract history-substring-search python zsh-autosuggestions zsh-syntax-highlighting)
配置本地代理
如果你配置了本地代理,并希望终端的 git 等命令使用代理,那么可以在~/.zshrc中添加:
# 为 curl wget git 等设置代理
proxy () {
  export ALL_PROXY="socks5://127.0.0.1:1089"
  export all_proxy="socks5://127.0.0.1:1089"
}

# 取消代理
unproxy () {
  unset ALL_PROXY
  unset all_proxy
}
以后在使用 git 等命令之前,只需要在终端中输入 proxy 命令,即可使用本地代理。
更新&卸载
#老版
$ uninstall_oh_my_zsh
Are you sure you want to remove Oh My Zsh? [y/N]  Y
$ upgrade_oh_my_zsh

# 新版
$ omz update